Believe it or not, I didn't actually forget about this blog. The holiday season just happened, and I have no idea where the last half of the year went. It's just about Christmas and then 2017 will be over and time for 2018 to start.
As the year comes to a close, I've been thinking a lot about what I've been doing with my art and making a living and how I want to move forward. There have been a lot of firsts this year, and I feel that the "making a living" part of my art has become a lot more diversified for me.
I started teaching this year at the Rochester Arc and Flame here in Rochester. Teaching is something, I had wanted to do for a while, but as a self taught artist I was scared that I would teach people the wrong way to make glass beads. There's always that fear of looking like you don't know what you are talking about. I constantly remind myself that I DO know what I'm doing and that teaching a different method is actually beneficial. I like having different methods to try to see what works best and my students do too.
In the same vein as teaching, I presented at the ISGB Gathering in Las Vegas about my stringer cats. It was a very stressful and scary, but also extremely rewarding experience. I wouldn't exactly call public speaking one of my fortes, but I made it through and people even seemed to like it. I'm a sucker for punishment and I will be doing another shorter presentation in 2018.
I also finally got my work into stores. I now have jewelry and gifts available for purchase at Whitman Works in Penfield and Little Button Craft in the city of Rochester. I'm even talking with another shop in New Orleans about my music pendants.
So that is what I've been up to in the past few months. It's been a lot of different things to balance and can sometimes be a bit of a struggle, but I'm in hopes that I will be relying on my part time retail job a little less. Looking forward to a busy 2018

Sunday, December 24, 2017
Tuesday, September 12, 2017
Applying to Exhibitions
So, when I find the opportunity (and the time), I try to apply to any exhibition that seems to be a good fit for my glasswork.
Usually there is a jurying fee just to apply that doesn't have any sway over whether your work gets into the exhibition or not. Photographing a piece, particularly when it is made of reflective glass has it's own challenges. It's also never been a money maker for me. It's usually available for sale at the exhibition, but the gallery gets a cut and I personally have never purchased anything or had my work purchased at an exhibition.
So, why do I do this?
For me, I think of it as a challenge and a way of stretching my creative muscles. Generally when I'm designing a piece for sale, I'm very aware of how much time I spend and therefore the price I will need to charge for the piece. When I'm making a piece with the intention of entering into an exhibit, I want my work to stand out and I don't have to care how much time and how much a piece will cost.
I start with doodling and getting a "vision" of what I want to create. Often times I try to incorporate a newer technique into my piece. This is a nice way for me to do a lot of learning about a process on my own. For example, the two most recent pieces that I entered over the last year were done off mandrel and introduced me to copper electroforming.
I find the deadline really helps me to focus. Often times I saw I'm going to learn a technique someday. Someday eventually can turn into never if you don't actually put in the work. I do this a lot more that I'd like to admit.
I'm sure there are many other benefits, like showing your work to a larger audience, but these are the benefits that I notice most.
So without further adieu, here is my most recent necklace that I've just shipped off to the Pittsburgh Glass Center for their upcoming Exhibition, Embodiment.


The finished product first

Glass cabochons made off mandrel with tiny birds drawn with stringer. These have been epoxied onto sealed feathers and I've started coating them withcopper conductive paint.

Fresh out of two days in the electroforming bath and I get to start the finishing process.

Testing blown hollow beads which included throwing them on the ground to see how durable they were. I only lost two that I had blown out too thin.

Progressing to linework on blowpipe hollow beads.

Me modeling the piece, so you can see how it lays. Notice the burn marks from bits of glass thermal shocking.

And then my favorite part, trying to figure out how to photograph the damn thing.
Wednesday, August 2, 2017
Layering Colors
One of the huge advantages of soft glass over borosilicate is the enormous variety of colors. There is a huge palette of transparent and opaque colors along with reactive silver glasses and the more temperamental opalino styles.


To give you even more options, along with mixing colors, transparent colors can also be layered over opaques to make a new look. The amount of colors that can be created is really almost overwhelming.
That is what I've been playing with in the past few weeks. I love transparent colors, but they can be a little problematic with my scrollwork designs because you can see through the body of the bead. You can also see the bead hole. It's not a bad thing, just often times not the look I'm going for. That's why usually I would work in opaque colors or I would etch the bead for a frosty look.


This last bead in the picture above is an example of a transparent color layered over white. You can see how it makes a very vibrant color and it hides the bead hole.
The only problem is that encasing an opaque color in a transparent takes a bit more time. Most opaque colors are softer, and the transparent colors are stiffer, so it is less like wrapping an apple in liquidy carmel and more like wrapping an apple in a stiff thick fudge. It can definitely be done, it just takes a bit more time heating the transparent and shifting it around, without letting the core become too hot.
That's why I've generally avoided too much encasing in the past, but I'm broadening my horizons and getting some very juicy colors in return.

Wednesday, July 26, 2017
When Sales are Slow
So, Summer time is generally the slower time for online sales in the art world. At least that has been my experience. There's always an ebb and flow to sales and despite 5 years of doing this as my main income, it can still be pretty scary when you hit a dry spell of sales.
On social media, I've seen a few posts from my peers indicating that they are having some slow sales days as well. That can be both comforting and frightening at the same time. One on hand, it's a relief that "it's not just me, it's slow everywhere." On the other hand when you see someone that to you is outrageously talented that is struggling it's "If they are struggling, how can I expect to succeed?"
This post is not supposed to be doom and gloom, it's about what positive actions can be taken when sales are slow. So here is what I try to do when the going gets tough.
1. Diversify your product. In my case, I used to only make beads and sell to jewelry designers. I had customers who loved my work, but didn't make jewelry. Now I can appeal to both jewelry designers and people who just admire my work, but don't know what to do with it. I have a few "beadable" items like pens and coffee scoops for husbands in tow with their wife who probably wouldn't want to wear jewelry.
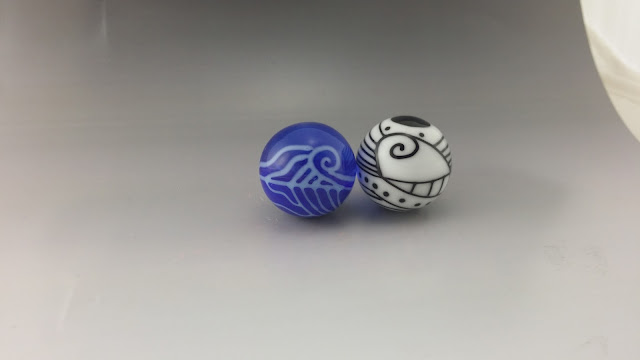
2. Experiment and try something new. This past month, I put in some serious practice and started making marbles. I'm stretching my abilities and learning something new. It helps me to be a better artist and it can lead to a new product that can be marketed to a new audience. Or maybe something new and exciting for your current audience.
3. Focus on outside promotion (like blogging). Sometimes all the different methods of self promotion can be a little overwhelming. When you have some down time, try to work on it. There's blogging, Pinterest, Facebook, Twitter, Instagram, mailing lists etc. Don't feel like you need to do it all at once. Maybe if you already have a blog, can you queue up more blog posts for when you will be too busy making beads.
4. Expand your line. Maybe you have a style of earring pair that sells well for you and is your "bread and butter." Can you make a matching set of 5-7? Can you make a focal? Can you do different shapes? Different colors?
5. Analyze the numbers. Maybe it's a good time to look at the numbers and see if you are putting in time efficiently. Maybe you invest some money in targeted FB ads. Analyze the numbers to see if it seems worth it to you. Do you spend too much time blogging? Is it yielding you any returns?
6. Do the chores. Balance the books, clean your workstation, reorganize the glass, vacuum out the kiln etc etc. Do them now and get them done with, so when you're busy at the holidays, you can really devote your time to creating.
7. Diversify your sales venues. I used to only sell on Etsy. When Etsy was slow, it was super scary because it felt like my only option. Now I sell on Facebook in many groups, in jewelry shows, bead shows, wholesale to a local bead shop, Etsy, I teach and sometimes people buy my beads in class. I still haven't tried to get my jewelry in stores for consignment, but I'm hoping to try this year.
8. Set up a sales event. Christmas in July anyone? Don't expect to just throw up a coupon and sales will start rolling in. Make an event out of it. Can you do a giveaway? Maybe a game to get people to interact? Can you get people excited about your new work with sneak peeks leading up to an unveiling and sale?
I'm sure I could think of more ideas if I really put my mind to it, but this is already quite a to do list. So, I know it's difficult sometimes, but when sales are not so great pull yourself out of the doldrums and put yourself to work. These things might not yield sales immediately, but they will benefit you eventually.
On social media, I've seen a few posts from my peers indicating that they are having some slow sales days as well. That can be both comforting and frightening at the same time. One on hand, it's a relief that "it's not just me, it's slow everywhere." On the other hand when you see someone that to you is outrageously talented that is struggling it's "If they are struggling, how can I expect to succeed?"
This post is not supposed to be doom and gloom, it's about what positive actions can be taken when sales are slow. So here is what I try to do when the going gets tough.
1. Diversify your product. In my case, I used to only make beads and sell to jewelry designers. I had customers who loved my work, but didn't make jewelry. Now I can appeal to both jewelry designers and people who just admire my work, but don't know what to do with it. I have a few "beadable" items like pens and coffee scoops for husbands in tow with their wife who probably wouldn't want to wear jewelry.
2. Experiment and try something new. This past month, I put in some serious practice and started making marbles. I'm stretching my abilities and learning something new. It helps me to be a better artist and it can lead to a new product that can be marketed to a new audience. Or maybe something new and exciting for your current audience.
3. Focus on outside promotion (like blogging). Sometimes all the different methods of self promotion can be a little overwhelming. When you have some down time, try to work on it. There's blogging, Pinterest, Facebook, Twitter, Instagram, mailing lists etc. Don't feel like you need to do it all at once. Maybe if you already have a blog, can you queue up more blog posts for when you will be too busy making beads.
4. Expand your line. Maybe you have a style of earring pair that sells well for you and is your "bread and butter." Can you make a matching set of 5-7? Can you make a focal? Can you do different shapes? Different colors?
5. Analyze the numbers. Maybe it's a good time to look at the numbers and see if you are putting in time efficiently. Maybe you invest some money in targeted FB ads. Analyze the numbers to see if it seems worth it to you. Do you spend too much time blogging? Is it yielding you any returns?
6. Do the chores. Balance the books, clean your workstation, reorganize the glass, vacuum out the kiln etc etc. Do them now and get them done with, so when you're busy at the holidays, you can really devote your time to creating.
7. Diversify your sales venues. I used to only sell on Etsy. When Etsy was slow, it was super scary because it felt like my only option. Now I sell on Facebook in many groups, in jewelry shows, bead shows, wholesale to a local bead shop, Etsy, I teach and sometimes people buy my beads in class. I still haven't tried to get my jewelry in stores for consignment, but I'm hoping to try this year.
8. Set up a sales event. Christmas in July anyone? Don't expect to just throw up a coupon and sales will start rolling in. Make an event out of it. Can you do a giveaway? Maybe a game to get people to interact? Can you get people excited about your new work with sneak peeks leading up to an unveiling and sale?
I'm sure I could think of more ideas if I really put my mind to it, but this is already quite a to do list. So, I know it's difficult sometimes, but when sales are not so great pull yourself out of the doldrums and put yourself to work. These things might not yield sales immediately, but they will benefit you eventually.
Tuesday, July 18, 2017
More Marble Adventures
So in my last entry I mentioned that I've been playing around with marbles. Since then, I've made quite a few more and I'm feeling more confident in my off mandrel work.
Here is some transparent blue over a core of white with silvered ivory linework. I've etched this to give it a glowing seaglass kind of look. I really love this glowing effect.

This one was my first marble with a new larger marble mold. I think I might have gotten a little excited about the large canvas to work with and I completely covered it with lines.

Transparent teal encased around a white core with sky blue linework. I really love the linework in this one. One side has a heart and the other a star. It feels like happy sidewalk chalk from childhood.


Here is some transparent blue over a core of white with silvered ivory linework. I've etched this to give it a glowing seaglass kind of look. I really love this glowing effect.


Here is my most recent one from the weekend. It's the largest one I've mad so far at 27mm. I tried combining some traditional boro styles of marbles with my stringer work. So, one side is a vortex, while the backing has been embellished with stringer that I left slightly raised.

This vortex style feels like a slight turning point for me because of the clear. The marbles that I haven't been showing or selling aren't quite meeting my standards because of the clarity of the clear glass. Most people who work with effetre know that the clear often has quite a few bubbles and scratches in it. When dirt and oil get caught in these scratches on the glass rod, it turns into "scum" on the finished glass product. There's nothing physically wrong with it, but when you are trying to create a clear lens to showcase and magnify, that scum and bubbles can be distracting.
The marble above has been made with larger diameter clear rods that I've cleaned very well using pickle. Pickle is a very mild acid that metal workers often use to clean the metal before soldering. The larger diameter clear also helps because less surface area of the glass rod is exposed to the elements.
I'm still working on finding the best clear for me to make marbles with. Next up to try is large diameter rods of the newly formulated super clear. After that, probably double helix Zephyr.
To be continued...
Saturday, June 10, 2017
Lost my Marbles
The past few weeks, I've really been enjoying making marbles. It started with my paperweight class a few weeks ago. During class, we didn't use a single mandrel. As someone who has been a beadmaker all of my glassy career, that can be rather intimidating, but I got used to it. I am looking forward to experimenting more with what I learned in class, but I have some tools on the way first for vacuum encasing.


Meanwhile, I started playing with marbles since I became comfortable with off mandrel work.
There was a bit of a learning curve.

But I finally got to the point where I wasn't having any thermal shocking, so that's always nice.

And now I'm working on finding my marble style.

There's still quite a few challenges. The main one I'm struggling with is keeping the transparent colors from getting scummy. The clarity of borosilicate clear is tough to compete with in soft glass. Maybe this will be what finally gets me to put some effort into learning boro.
Tuesday, May 23, 2017
Paperweight Class with David Graeber
So this past weekend I commuted to Expressive Glass in Buffalo to take a class on paperweights with David Graeber. I had a great time and learned lots, so I thought I would share a few pictures with you.

Each flower in the paperweight is created off mandrel in advance. It's crazy how tiny they need to be to fit in the paperweight. You can see in the picture above the tiny pinpoint flame he's using to create the rose in the below picture. The other thing that I really liked is how in sculpting these, he only used his torch and a pair of tweezers. Tools are wonderful, but it's nice to have the ability to create something with just the glass and the flame.

My first flower that survived on day one. It's not too bad, but definitely not the rose above


My first components were still waaaay too big to fit in the small paperweights we were making in class, but practice makes perfect (or at least good enough) as seen in my day two picture below. I even managed to make a tiny kitty. It just wouldn't be my work without a cat of some sort included. The grouping of the cat, blueberry, rasberries and flower ended up going in my paperweight. I wish I had a picture, but that will have to wait for another time as it went immediately into the kiln and it will be shipped to me in a few days.

Will I be making paperweights? Probably not any time soon, but I might try making some tiny flowers to add to my beads. I am going to try to build a tiny vacuum encasement setup to maybe play with marbles or decorative scenes in the future. We'll see.
Wednesday, May 17, 2017
Electroformed Pendant
One of the newest techniques I have been playing with this year is electroforming or electroplating. That is a process where metal is deposited on a conductive surface using an electrical current in an electrolyte bath.
It starts with my glass.

combined with copper, epoxy clay and microbeads for texture.

Next the non copper surfaces are painted with a conductive paint.

Into the blue electroforming solution below and connected to a battery.

12i-24 hours later I end up with a super shiny copper formed piece

Next comes the finishing and sealing and my piece is finished.

Tada!
Thursday, May 11, 2017
Back at it Again
Well, if you're still with me, then you are probably aware that I am an erratic blogger at best. But, here I am!
What's new since last time I posted, you might ask? Let's start with my newest style of bead

What's new since last time I posted, you might ask? Let's start with my newest style of bead

Blinging dichroic and a pink kitty cat with a crown and cubic zirconia collar. The cat is actually "drawn" in the flame with hairthin pieces of stringer freehand. Her tabby drawings are made with silvered ivory. The entire bead is about the width of my palm and is more intended as a collector piece, though it's not too heavy to make a necklace with it. They do take me a few hours for each bead and I end up using my most expensive glass in them. They really are a labor of love and a stretch of my abilities as a glass artist.
Why have I started making these?
Well, they make me happy and they bring a smile to people's faces. I think the world could use more of that lately.
Subscribe to:
Posts (Atom)